You use the Warehouse File Update screen - Warehouse tab to add or edit the general warehouse details such as warehouse name, address and phone numbers.
Refer to "Adding a New Warehouse" or "Updating a Warehouse".
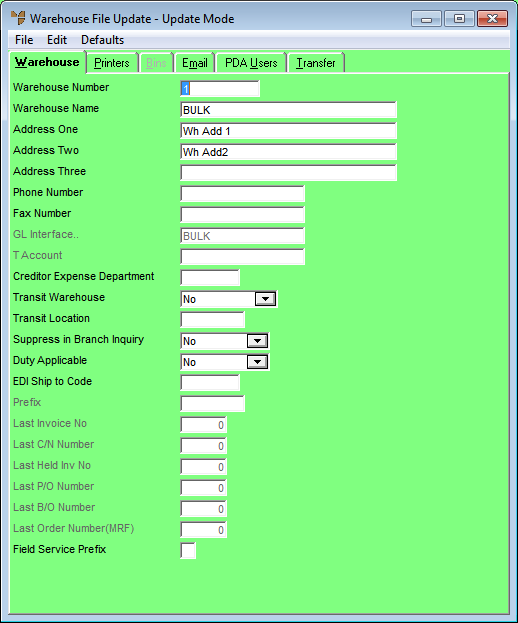
Micronet displays the Warehouse File Update screen - Warehouse tab.
|
|
Field |
Value |
|||||||||||||||
|---|---|---|---|---|---|---|---|---|---|---|---|---|---|---|---|---|---|
|
|
Warehouse Number |
Enter a unique ID of up to five characters for the warehouse. |
|||||||||||||||
|
|
Warehouse Name |
Enter a name for the warehouse. |
|||||||||||||||
|
|
Address One, Two, Three |
Enter up to three lines for the warehouse address (e.g. the street address on the first line, the suburb on the second line, and the state and postcode on the third line). |
|||||||||||||||
|
|
Phone Number |
Enter the phone number for the warehouse. |
|||||||||||||||
|
|
Fax Number |
Enter the fax number for the warehouse. |
|||||||||||||||
|
GL Interface |
If you want to dissect sales/stock/debtors by warehouse, enter the name of the GL interface record for this warehouse. For more information on setting up GL interface records, refer to "Setting up Micronet Integration". |
||||||||||||||||
|
T Account |
If you are using T accounting within MGL, assign the default details for this warehouse. |
||||||||||||||||
|
Creditor Expense Department |
Use this field if you want to allow a substitute GL expense account for each creditor in MCL (e.g. if you require different expense codes for each creditor/warehouse combination). The department code you enter in this field must match the specified length for the GL department. That is, the account and sub-account sections need to be identical for each expense account being substituted. When Micronet retrieves the default expense account for creditors, it will replace the department section of the GL account with the department code you enter here. Before you can do this, you must have setup the creditor record in MCL to allow a substitute GL expense account. Refer to "File - Creditor". |
||||||||||||||||
|
Transit Warehouse |
Transit warehouses may be established so that, rather than directly transferring stock from one physical location to another, you can book the items out into “transit” and book them in when they arrive at their destination. This allows users to always see the actual stock status at any point in time, even when it is being moved from one warehouse to another, e.g. Sydney to Brisbane, If you want to have transit locations, then a good convention to setting these up would be to have:
Select whether the warehouse you are setting up is a transit warehouse. Options are:
|
||||||||||||||||
|
Transit Location |
If you selected In Transit in the previous field, enter the name of the transit location, e.g. Brisbane To. |
||||||||||||||||
|
Suppress in Branch Inquiry |
|
||||||||||||||||
|
Duty Applicable |
Select Yes if duty applies to this warehouse or No if it doesn’t |
||||||||||||||||
|
EDI Ship to Code |
|
|
|

|
Technical Tip You can only enter information in the remaining fields on this dialogue if separate sequence numbers for each warehouse are setup in the system parameters. See the Use Warehouse Numbers field on the General Configuration screen (refer to "Edit - Program - General"). You can only enter a number greater than the last number issued - e.g. you cannot enter an invoice number that has already been issued. To maintain other last used numbers, refer to "Edit Company - Edit - Last Used Numbers". |
|
|
Prefix |
Enter any prefix (up to five characters) that you would like to have in front of invoice numbers, credit note numbers, held invoice numbers, purchase order numbers, backorder numbers or MRF order numbers for this warehouse. For example, if you enter B for Brisbane, Micronet would prefix invoice and order numbers for this warehouse with a B (e.g. B10021). |
|
|
Last Invoice Number |
Enter the last invoice number for this warehouse. |
|
|
Last C/N Number |
Enter the last credit note number for this warehouse. |
|
|
Last Held Inv No |
Enter the last held invoice number for this warehouse. |
|
|
Last P/O Number |
Enter the last purchase order number for this warehouse. |
|
|
Last B/O Number |
Enter the last backorder number for this warehouse. |
|
|
Last Order Number (MRF) |
If you are using Micronet Roll Forming, enter the last MRF order number. |
|
|
Field Service Prefix |
If your company uses the Field Service module to manage a fleet of mobile technicians or installers, enter a single character representing the warehouse prefix for field service order numbers. This will help users to distinguish field service orders from normal invoices. Field service order numbers are made up of this prefix and the Last Held Inv Number for either the warehouse or the company depending on your company configuration (i.e. depending on the setting in the Use Warehouse Numbers field on the General Configuration screen [refer to "Edit - Program - General"]). For more information about Field Service, refer to "Wide Warehouse Scheduler - Field Service" . |